开发基础
开发基础笔记
mybatis-plus通用的service方法
通过jenkins配置前后端自动打包及发布
mybatis-plus实现分页的方式
Java极客技术公众号PDF
狂神说SpringBoot
Hashids java 版使用
SpringBoot
1、Web快速开发
2、结果集的封装
3、集成MyBatis实现数据库操作
4、Springboot @Validated参数校验
5、SpringBoot全局异常处理
6、拦截器HandlerInterceptor
7、集成Swagger实现API自动生成
8、集成knife4j实现API自动生成
9、Springboot集成MyBatis-Plus快速入门
10、springboot自定义注解及AOP切面使用
11、使用Shiro实现登陆和权限认证,基于MyBatis
12、集成SpringSecurity实现授权认证
13、SpringBoot集成EasyExcel实现数据导入与导出
14、Spring Task定时任务的实现
15、Quartz快速上手与实践
16、如何用代码实现Spring IOC
17、SpringBoot集成JWT,实现接口的鉴权交互
SpringCloud
Nacos作为服务注册中心
seata1.6.1 结合springcloud实现分布锁的技术笔记
一些技术博客推荐
前端面试相关
看这一篇就够了
java.util包常用的类和接口
CountDownLatch介绍与使用
Common-lang3使用入门
Hutool简单使用入门
lombok 介绍及基本使用方法
git项目统计成员代码行数和提交的次数
mysql 逗号分隔的数据 like查询
使用sonar进行代码质量检查
线上使用jmeter进行压测的时候,使用Arthas诊断工具排查响应慢的接口
php结合phpstudy8、vscode开启xdebug进行代码调试
node-red使用入门
本文档使用 MrDoc 发布
-
+
首页
11、使用Shiro实现登陆和权限认证,基于MyBatis
Shiro是Apache下的一个开源的,强大且易用的Java安全框架,可以执行身份验证、授权、密码和会话管理。相对于SpringSecurity简单的多,也没有SpringSecurity那么复杂。 ### 1、引入坐标 这里引入了 thymeleaf,没有采用前后端分离的API接口方式开发,登录状态的维持使用了传统的session会话,等以后会再出一个章节,针对 前后端分离的方式使用jwt实现无状态的权限认证。 引了了lombok ,简化了实体类里要写大量set和get的麻烦。 ```xml <dependencies> <dependency> <groupId>org.mybatis.spring.boot</groupId> <artifactId>mybatis-spring-boot-starter</artifactId> <version>1.3.1</version> </dependency> <dependency> <groupId>org.springframework.boot</groupId> <artifactId>spring-boot-starter-thymeleaf</artifactId> </dependency> <dependency> <groupId>org.springframework.boot</groupId> <artifactId>spring-boot-starter-web</artifactId> </dependency> <dependency> <groupId>mysql</groupId> <artifactId>mysql-connector-java</artifactId> <scope>runtime</scope> </dependency> <dependency> <groupId>org.projectlombok</groupId> <artifactId>lombok</artifactId> <optional>true</optional> </dependency> <!--shiro--> <dependency> <groupId>org.apache.shiro</groupId> <artifactId>shiro-all</artifactId> <version>1.4.0</version> <type>pom</type> </dependency> <dependency> <groupId>org.springframework.boot</groupId> <artifactId>spring-boot-starter-test</artifactId> <scope>test</scope> </dependency> </dependencies> ``` ### 2、关键表说明 user_info 基本用户信息表 sys_role 用户角色表 sys_permission 权限表 sys_user_role 关系表:用户和角色的关系 sys_role_permission 关系表:角色和权限的关系 **表结构和表数据 简单说明:** 有两个用户:admin 和 test ,admin是超级管理员,可以访问所有菜单 有两个角色:管理员角色 和 VIP角色 有三个菜单权限:userAdd userList userDel 管理员角色可以访问:userAdd userList VIP可以访问:userDel admin 在管理员组,test在VIP组,但是因为admin是超级管理员,所以在哪个组也无所谓了,不管在哪个组,都可以访问系统所有的菜单权限。 **核心配置文件** platform.admin.account = admin 这个配置参数,是用来配置 超级管理员的账号用的。 ```yaml spring: datasource: url: jdbc:mysql://localhost:3306/demo_springboot?&serverTimezone=UTC username: root password: 123456 driver-class-name: com.mysql.jdbc.Driver thymeleaf: cache: false mode: LEGACYHTML5 mybatis: type-aliases-package: com.mmno.entity mapper-locations: classpath*:mapper/*.xml platform: admin: account: admin ``` ### 3、两个关键文件之一:ShiroConfig.java 此文件建议放到config包下面 shiro的配置主要集中在 ShiroFilterFactoryBean 中 关于权限: anon:无需认证就可以访问 authc:必须认证了才能访问 user:必须用有了 记住我 功能才能用 perms:拥有对某个资源的权限才能访问 role:拥有某个角色权限才能访问 HashedCredentialsMatcher配置了密码加密的算法过规则 ,比如这里配置是使用md5进行加密,然后 只执行一次md5,如果setHashIterations传了参数2,那么就是md5执行2次,相当于md5(md5("原始密码"))。 ```java @Configuration public class ShiroConfig { @Bean public ShiroFilterFactoryBean shiroFilterFactoryBean(SecurityManager securityManager) { ShiroFilterFactoryBean shiroFilterFactoryBean = new ShiroFilterFactoryBean(); shiroFilterFactoryBean.setSecurityManager(securityManager); Map<String, String> filterChainDefinitionMap = new LinkedHashMap<>(); filterChainDefinitionMap.put("/logout", "logout"); filterChainDefinitionMap.put("/index", "user"); filterChainDefinitionMap.put("/", "user"); filterChainDefinitionMap.put("/favicon.ico", "anon"); filterChainDefinitionMap.put("/**", "authc"); //authc表示需要验证身份才能访问,还有一些比如anon表示不需要验证身份就能访问等。 shiroFilterFactoryBean.setLoginUrl("/login"); shiroFilterFactoryBean.setSuccessUrl("/index"); shiroFilterFactoryBean.setFilterChainDefinitionMap(filterChainDefinitionMap); return shiroFilterFactoryBean; } //SecurityManager 是 Shiro 架构的核心,通过它来链接Realm和用户(文档中称之为Subject.) @Bean public SecurityManager securityManager() { DefaultWebSecurityManager securityManager = new DefaultWebSecurityManager(); securityManager.setRealm(myShiroRealm()); //将Realm注入到SecurityManager中。 securityManager.setCacheManager(ehCacheManager()); //注入缓存对象。 securityManager.setRememberMeManager(cookieRememberMeManager()); //注入rememberMeManager; return securityManager; } @Bean public MyShiroRealm myShiroRealm() { MyShiroRealm myShiroRealm = new MyShiroRealm(); myShiroRealm.setCredentialsMatcher(hashedCredentialsMatcher()); //设置解密规则 return myShiroRealm; } // 因为我们的密码是加过密的, // 所以,如果要Shiro验证用户身份的话,需要告诉它我们用的是md5加密的,并且是加密了两次。 // 同时我们在自己的Realm中也通过SimpleAuthenticationInfo返回了加密时使用的盐。 // 这样Shiro就能顺利的解密密码并验证用户名和密码是否正确了。 @Bean public HashedCredentialsMatcher hashedCredentialsMatcher() { HashedCredentialsMatcher hashedCredentialsMatcher = new HashedCredentialsMatcher(); hashedCredentialsMatcher.setHashAlgorithmName("md5");//散列算法:这里使用MD5算法; hashedCredentialsMatcher.setHashIterations(1);//散列的次数,比如散列两次,相当于 md5(md5("")); return hashedCredentialsMatcher; } /** * 开启shiro aop注解支持. * 使用代理方式;所以需要开启代码支持; * @param securityManager * @return */ @Bean public AuthorizationAttributeSourceAdvisor authorizationAttributeSourceAdvisor(SecurityManager securityManager){ AuthorizationAttributeSourceAdvisor authorizationAttributeSourceAdvisor = new AuthorizationAttributeSourceAdvisor(); authorizationAttributeSourceAdvisor.setSecurityManager(securityManager); return authorizationAttributeSourceAdvisor; } @Bean public SimpleMappingExceptionResolver resolver() { SimpleMappingExceptionResolver resolver = new SimpleMappingExceptionResolver(); Properties properties = new Properties(); properties.setProperty("org.apache.shiro.authz.UnauthorizedException", "/403"); resolver.setExceptionMappings(properties); return resolver; } @Bean public EhCacheManager ehCacheManager() { System.out.println("ShiroConfiguration.getEhCacheManager()"); EhCacheManager ehCacheManager = new EhCacheManager(); ehCacheManager.setCacheManagerConfigFile("classpath:ehcache-shiro.xml"); return ehCacheManager; } //cookie对象; @Bean public SimpleCookie rememberMeCookie() { System.out.println("ShiroConfiguration.rememberMeCookie()"); //这个参数是cookie的名称,对应前端的checkbox的name = rememberMe SimpleCookie simpleCookie = new SimpleCookie("rememberMe"); //<!-- 记住我cookie生效时间30天 ,单位秒;--> simpleCookie.setMaxAge(259200); return simpleCookie; } //cookie管理对象; @Bean public CookieRememberMeManager cookieRememberMeManager() { System.out.println("ShiroConfiguration.rememberMeManager()"); CookieRememberMeManager manager = new CookieRememberMeManager(); manager.setCookie(rememberMeCookie()); return manager; } } ``` ### 4、两个关键文件之二:MyShiroRealm.java 此文件建议放到config包下面 doGetAuthenticationInfo:用于登录的认证,通过SimpleAuthenticationInfo认证器。 doGetAuthorizationInfo:用于权限的认证, 通过sysRoleMapper.findRoleByUsername的循环,循环给 authorizationInfo添加角色 和 菜单权限 信息:authorizationInfo.addRole和authorizationInfo.addStringPermission。 ```java public class MyShiroRealm extends AuthorizingRealm { @Autowired UserInfoService userInfoService; @Autowired SysRoleMapper sysRoleMapper; @Autowired SysPermissionMapper sysPermissionMapper; @Override protected AuthenticationInfo doGetAuthenticationInfo(AuthenticationToken token) throws AuthenticationException { System.out.println("MyShiroRealm.doGetAuthenticationInfo()"); //获取用户的输入的账号. String username = (String)token.getPrincipal(); System.out.println("token.getCredentials() = " + token.getCredentials().toString()); //通过username从数据库中查找 User对象,如果找到,没找到. //实际项目中,这里可以根据实际情况做缓存,如果不做,Shiro自己也是有时间间隔机制,2分钟内不会重复执行该方法 UserInfo userInfo = userInfoService.findByUsername(username); System.out.println("----->>userInfo="+userInfo); if(userInfo == null){ ////没有返回登录用户名对应的SimpleAuthenticationInfo对象时,就会在LoginController中抛出UnknownAccountException异常 return null; } SimpleAuthenticationInfo authenticationInfo = new SimpleAuthenticationInfo( userInfo, //用户名 userInfo.getPassword(), //密码 ByteSource.Util.bytes(userInfo.getCredentialsSalt()),//salt=username+salt getName() //realm name ); return authenticationInfo; } @Override protected AuthorizationInfo doGetAuthorizationInfo(PrincipalCollection principal) { System.out.println("权限配置-->MyShiroRealm.doGetAuthorizationInfo()"); SimpleAuthorizationInfo authorizationInfo = new SimpleAuthorizationInfo(); UserInfo userInfo = (UserInfo)principal.getPrimaryPrincipal(); sysRoleMapper.findRoleByUsername(userInfo.getUsername()).stream().forEach( sysRole -> { authorizationInfo.addRole(sysRole.getRole()); sysPermissionMapper.findPermissionByRoleId(sysRole.getId()).stream().forEach( sysPermission -> { authorizationInfo.addStringPermission(sysPermission.getPermission()); } ); } ); return authorizationInfo; } @Value("${platform.admin.account}") private String adminAccount; /** * 为超级管理员添加所有权限 * @param principals * @param permission * @return */ @Override public boolean isPermitted(PrincipalCollection principals, String permission){ UserInfo user = (UserInfo)principals.getPrimaryPrincipal(); return adminAccount.equals(user.getUsername()) || super.isPermitted(principals,permission); } /** * 为超级管理员添加所有角色 * @param principals * @param roleIdentifier * @return */ @Override public boolean hasRole(PrincipalCollection principals, String roleIdentifier) { UserInfo user = (UserInfo)principals.getPrimaryPrincipal(); return adminAccount.equals(user.getUsername()) ||super.hasRole(principals,roleIdentifier); } } ``` ### 5、启用缓存 EHCache 缓存配置文件使用到了ehcache-shiro.xml 以下代码截取自:ShiroConfig.java ```java @Bean public EhCacheManager ehCacheManager() { System.out.println("ShiroConfiguration.getEhCacheManager()"); EhCacheManager ehCacheManager = new EhCacheManager(); ehCacheManager.setCacheManagerConfigFile("classpath:ehcache-shiro.xml"); return ehCacheManager; } ``` ### 6、记住我 RememberMe 以下代码截取自:ShiroConfig.java ```java //cookie对象; @Bean public SimpleCookie rememberMeCookie() { System.out.println("ShiroConfiguration.rememberMeCookie()"); //这个参数是cookie的名称,对应前端的checkbox的name = rememberMe SimpleCookie simpleCookie = new SimpleCookie("rememberMe"); //<!-- 记住我cookie生效时间30天 ,单位秒;--> simpleCookie.setMaxAge(259200); return simpleCookie; } //cookie管理对象; @Bean public CookieRememberMeManager cookieRememberMeManager() { System.out.println("ShiroConfiguration.rememberMeManager()"); CookieRememberMeManager manager = new CookieRememberMeManager(); manager.setCookie(rememberMeCookie()); return manager; } ``` **thymeleaf涉及模板文件** 403.html index.html login.html userInfo.html userInfoAdd.html userInfoDel.html **项目目录结构:** 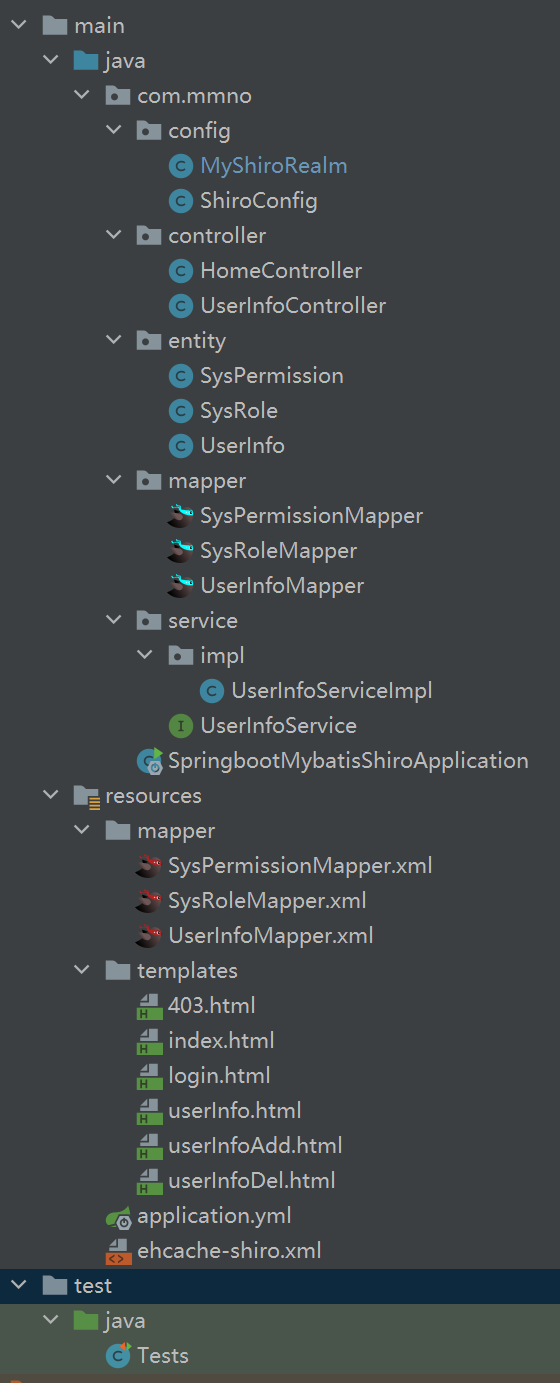 #### 验证代码: ~~~java @RequestMapping("/login") public String login(HttpServletRequest request, Map<String, Object> map) { // 登录失败从request中获取shiro处理的异常信息。 // shiroLoginFailure:就是shiro异常类的全类名. Object exceptionClassName = request.getAttribute("shiroLoginFailure"); String msg = ""; if (exceptionClassName != null) { if (UnknownAccountException.class.getName().equals(exceptionClassName)) { msg = "用户名不存在"; } else if (IncorrectCredentialsException.class.getName().equals(exceptionClassName)) { msg = "用户名/密码错误"; } else if ("randomCodeError".equals(exceptionClassName)) { msg = "验证码错误"; } else { msg = "其他异常"; } } map.put("msg", msg); // 此方法不处理登录成功,由shiro进行处理. return "login"; } ~~~ #### 手动验证 除了上面这种通过shiro的全局拦截器进行认证,shiro还可以手动调用的方式进行认证: ~~~java @RequestMapping("/login") public String login(HttpServletRequest request, Map<String, Object> map) throws Exception{ // 登录失败从request中获取shiro处理的异常信息。 // shiroLoginFailure:就是shiro异常类的全类名. Subject subject = SecurityUtils.getSubject(); if (!subject.isAuthenticated()){ UsernamePasswordToken token = new UsernamePasswordToken("admin","123456"); try{ subject.login(token); }catch (Exception e){ e.printStackTrace(); } } return "/login"; } ~~~ ### 常见问题 1、如果更改了密码的加密规则 ,如何重新生成相应的密码? ```java @Test public void contextLoads() { String password = "123456"; String salt = "testabcdefg"; int hashIterations = 1; SimpleHash simpleHash = new SimpleHash("md5",password, ByteSource.Util.bytes(salt),hashIterations); System.out.println(simpleHash.toHex()); // 结果 : a6e8c4f9da2c4d71149a700dd9047650 } ``` 上面这个方法,密码生成的规则是使用 salt值 abcdefg,md5加密1次,用户名是test的密码值 获取,结果是:a6e8c4f9da2c4d71149a700dd9047650
superadmin
2023年11月3日 17:20
转发文档
收藏文档
上一篇
下一篇
手机扫码
复制链接
手机扫一扫转发分享
复制链接
Markdown文件
分享
链接
类型
密码
更新密码